Bye Bye Depron?
You might have heard through the grapevine that Depron is going away in the very near future. Well, it looks like it will be getting a lot harder to get, at least in the U.S., as the domestic supplier is closing down its supply of flat 6mm depron....
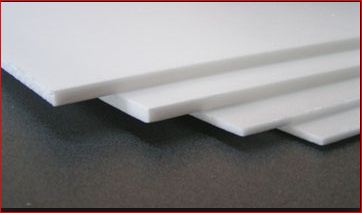
You might have heard through the grapevine that Depron is going away in the very near future. Well, it looks like it will be getting a lot harder to get, at least in the U.S., as the domestic supplier is closing down its supply of flat 6mm depron.
Depron has been a great material and certainly sparked the parkjet revolution. The ease of use along with the smooth finish meant people could achieve crazy results that looked very scale while maintaining an easy building experience.
If you still want to get your hands on some depron, especially in the form of a kit, now is a great time to head over to our sponsor's website, www.6mmflyrc.com and pick up a parkjet kit. I know they will be making some adjustments soon to their product, but depron is on the shelves now, so get them while they last.
So what now? Well, there are other alternatives on the market and there will sure to be some other similar materials to fill the gap. We like to use all kinds of different foams and each one has its strengths and weaknesses.
Drop us a line at parkjets@gmail.com if you have some suggestions and some tips on handling the new foam that will surely come to the front of the builders worktable.
PANEL LINES - DAMBUSTERS
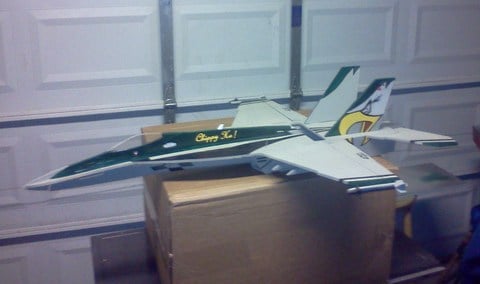
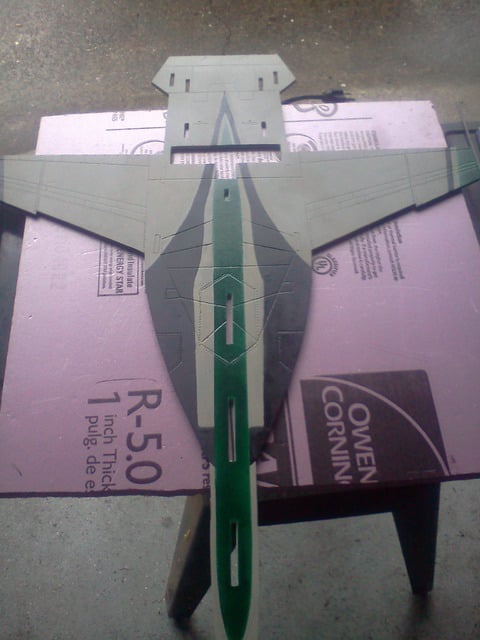
We got an E-mail over the last week with some awesome pictures attached. Shaun decided to take Tomas Hellberg's F-18E Superhornet design and do some custom work. This is just something you can't get out of a box.
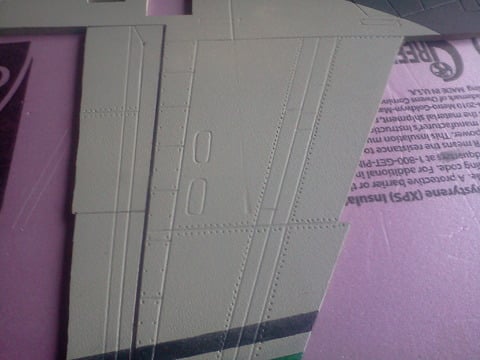
He added in a custom battery hatch, custom airbrakes, and an LED flashing light set up all worked into the design. We won't really discuss his custom paint job representing the VFA-195 squadran out of Japan, because we noticed something else, careful panel lines pressed right into the foam.
We got an E-mail over the last week with some awesome pictures attached. Shaun decided to take Tomas Hellberg's F-18E Superhornet design and do some custom work. This is just something you can't get out of a box.
He added in a custom battery hatch, custom airbrakes, and an LED flashing light set up all worked into the design. We won't really discuss his custom paint job representing the VFA-195 squadran out of Japan, because we noticed something else, careful panel lines pressed right into the foam.
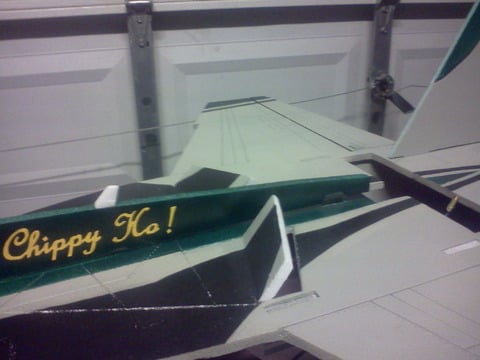

We hope he sends over a video (hint hint) but we decided to share his work for all you builders out there looking for some inspiration.
Here is how he said he managed to get the panel line look just right...
"For the panel lines I took a piece of landing gear from an old helicopter that had a nice plastic ball on the end. Then i took a pic that showed the detailed panel lines on the real bird and measured them to the depron as close as i could get for the right look. Then I used just a simple ruler and ran the plastic ball along the lines using just enough pressure to indent the foam. A bit of work but it looks great in the end. As far as the tail art , I took a drawing i did of the art and then cut each individual piece out. Then sort of like a puzzle i placed the pieces one by one on the tail used a pencil to trace the outlines leaving a small dent, similar to the panel line method. Then with regular testors model paint you can hand paint the colors. Leaving the small dent in the foam while outlining the pieces i found that the paint would run into the dent and leave a nice crisp line. I let the paint dry then continue each section as needed. This works so much better then using decals. I've had a few jets that would tend to lose the decals while at high speeds...."
Great work Shaun! This type of details makes even the simpliest profile jet look so custom. And a sense of pride when you finish.
For everyone else, keep sending over your work, we love it!
GLUE BASICS
This post was originally created a long time ago, so updating felt like a good idea. After all, over the past several years, new adhesives have come onto the market.
But, no matter what RC glues are out there, TRY IT OUT ON A SCRAP PIECE OF FOAM FIRST, so you understand how it reacts with the foam your using!!
Someone once said, "There is a glue for every job", well they must have been a R/C Hobby Shop owner (or a home improvement store salesman). When building a lot of the models featured on Parkjets.com, there are so many different glues you can use and a lot you should use. So lets give the quick run down.
Epoxy Glue - There are several types of epoxy on the market, all of them come in two parts that you have to mix together. Parkjets recommends getting some of the 5 minute stuff from the local hobby store. These glues are rated by the "Pot-life", or the amount of time you have to work with the stuff before it turns as hard as cement. 5 or 6 Minute and 30 Minute Expoy glues are most common. One good thing about epoxy is that it is very fast (5 minute variety) and creates a very strong bond. When we build, we like to use epoxy to bond in any carbon wing support. It is pretty much going to lock the carbon rod or spar into place for good. It can be a heavy glue, but when used to bond regular joints or for repair jobs, a good bond with minimal weight gain is possible. We like to use it at the field when a repairable crash occurs. You do need some disposable cups (the small bathroom plastic cups work great) and some small wooden sticks help too.
It's not the cheapest stuff in the world, but its not overly expensive either. For us, epoxy is a must have glue in the tool box and the #1 glue we use when building parkjets.
Cyanoacrylate (CA Glue) These are part of the "Super Glue" family of adhesives. "Normal" CA glue is NOT safe for foam, it melts foam on contact, so use it only on parts that do not come in contact with foam. Normal Store bought "Super Glue" is NOT Safe for foam.
There are however some CA glues which can be used with foam, and they are sold as "Foam Safe Glues". Most of these glues require the use of an accelerent or "Kicker" to activate the chemicals to get the glue to dry fast. One great benefit of CA glue is that with a kicker, the bond is almost instant. But, like super glues, the dried glue is brittle and will break off. This glue is not good at filling gaps but doesnt weight much either. It can also be difficult to find in stores, but its never a bad thing to have a bottle or two in your bag of tricks. For us, its totally optional. We know a lot of folks swear by the stuff, but honestly, we have had very little success using this type of glue.
Polyurethane Glue This type of glue when mixed with water, will expand slightly and foam up to fill any cracks or seams in the glue joint, and it drys to a hard finish which is sandable (much easier than epoxy). The glue sets up quite fast, and it is much easier and safer to use than expoy. There are several brands of polyurethane glue (sort of looks like maple syrup) with Elmers Probond, and Gorilla Glue being the most popular. One big drawback of this glue is that it can make a mess. And when using it, it does take some time to cure, so using pins to keep parts in place is always a good idea. Also, with many of them the color of the dried product is pretty ugly. The bond is excellent, but ugly. We barely use this stuff.
Hot-Melt Glue: This type of glue works very well, but it's main drawback is that it is VERY Heavy compared to other glues. So if you decide to use it, just use it in small amounts, as lightly as possible. Hot glue is really pretty great though for many of the plans on parkjets. Especally those that are simply tabbed for construction, like the Tomas Hellberg models or many of the profile type shock flyers. One draw back, if you are wanting to create invisible seams, hot glue is not for you. Also, it can melt the foam because its too hot, but most of the time its really obvious your gun is too hot.
A big advantage is that the bond is decent and flexible. The flexible bond has advantages and the bond is almost instant. If you are throwing together a park flyer for a weekend project, hot glue is a good choice. Just remember at the flying field, its useless for repairs unless you have a cordless version, or one that can plug into your car, so pack the epoxy.
You can also check out the GLUE RESULTS TEST on RC GROUPS to get more information. The above is a great starting point, but with new glues on the market all the time, chances are, there might be something you might like better.
After spending the past 5 years building pusher jets, there are other glues not mentioned here that I've found to be very helpful when building with depron, or other types of foam:
Beacon 3-in-1 Advanced Craft Glue - This is a contact cement, much like the GWS Glue included in the GWS foamy kits. And since this glue has acetone in it, you must follow the directions closely to prevent any foam melting. Simply apply a thin layer of glue on each surface to be joined. Press the parts together to allow the glue to spread evenly and then pull apart. Wait about 20-30 seconds, then press the parts back together. This glue grabs pretty hard right away, so be sure to align the parts properly as you may not be able to separate them again. This glues sets in about 20 minutes, and fully cures in 24 hours. We typically glue an entire plane together in one sitting if we use this glue, then let it sit overnight to cure before continuing the build.
Beacon Foam Tac - Very similar to their 3-in-1 glue, but with less acetone. This glue was specially developed by Beacon for use on foam products, especially depron.
UHU Por (also called "UHU Creativ for Foam" in the US) - Another great contact cement manufactured in Europe. It is very hard to find in the US, the "Creativ" version is no longer sold at all. Works pretty much the same as 3-in-1.
3M Super77 Spray Adhesive - This glue is pretty easy to find and works great if you are printing off plans and glueing them down on your foam. However, be sure to spray the glue from a distance as the propellant can melt the foam. Super77 comes in a large aerosol can. Super77 is great for laminating several pieces of foam together (such as making a block for a nosecone or canopy), or for parts where heavy sanding will occur. This glue holds strong, but will not ball up when sanding parts to shape.
Beacon 3-in-1 can be found in most craft stores such as Michael's and Jo-Ann's, but you can also buy it online at places like RCFoam.com, among others. Beacon Foam Tac and UHU Por are a little harder to find, but a Google search will show several shopping results. RCFoam also carries these glues. Super77 can also be found in craft stores, as well as hardware stores.
Parkjets would like to thank Pat Gagnon of NicoHobbies for his contribution to this article.
Using Parkjets.com - What You Need to Know
Parkjets.com gets a lot of traffic. Nearly 3 million page views a year. And lots of downloads. So sometimes we get questions along the lines of "where do I start?" Some free RC airplane plan sites can be confusing, so we thought a little guidance would be helpful. 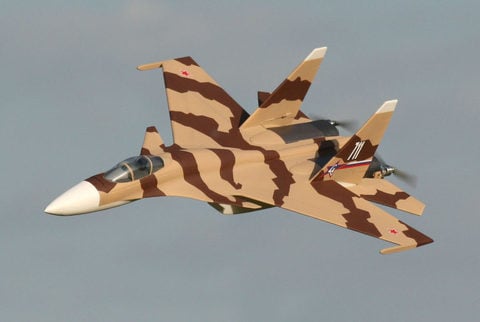 Steve Shumate Designed SU-37 TerminatorFirst, its important to understand that all the plans on Parkjets are available freely in the public domain. Check out our post about it in detail. We have posted them here with the permission of the designers and don't provide direct support for any of the plans. Basically, we created Parkjets because it was difficult to find all the great designs out there in an easy to navigate website. We do try to answer basic questions we get, but sometimes we have never tried to build some of the designs, so we really don't know much about them.
The number one thing you need to know is that Parkjets is 100% free. We like to say its the number 1 site for free RC airplane plans out there. We don't require registration, we don't ask for your personal information or anything like that. We put out a monthly newsletter (please sign up at the end of the post if interested) but we view Parkjets as an RC plan resource for the community. So use it. It doesnt cost you a thing. We manage to get by on a few ads, but also largely from a generous site sponsorship from 6mmFlyRC.com (please visit them).
Lets break down the site itself a little...
The home page is pretty basic but contains blog posts, twitter feeds and "I want to know more about" section in the center. Just see something you want to explore and away you go. The blog is divided up into different catagories "getting started," "motors," and "building." You can click the top links in the top navigation to sort through the different posts quickly. Check out the post on flying safety, it is a must read.
The most popular page is of course the "Free Plans" page on parkjets. You will notice the grid layout and also on the right side bar a section that says "Show me Parkjets in" which is really just a fast way to sort though the various designs we have. You can select by designer name, build matierial, if a kit is available, etc. It's a fast way to narrow down your hunting. You will notice at the bottom of the grid you can go to the next page of designs, or skip around. Pretty standard stuff.
Once you click on an RC plane to view in more detail, the selector "show me parkjets" moves to the left. It's not the best web design, but it gets the job done.
On each RC plan page, you can see details on the design like pictures and video and also other information on the page too. Some of the plans even have recommended electronic equipment. Its important to note that some of these recommendations are quite old in RC years, like 3-4 years old, and the hobby has evolved with different motors and standards. So do a little homework or just send us an E-mail and we should be able to help you out with making a more modern choice. With parkjets, we compressed all the files and have them available for download in the standard .zip format, so anyone can get to them. Once inside the zip file, all the plans are in the standard .pdf format that is widely used with a free reader from Adobe.
We don't want to skip over an important part of the individual rc plans pages. For most plans, there is an opportunity to donate directly to the designer via Paypal. Parkjets doesn't get a cut of this donation. Its just a nice way to say thanks to the designer of your favorite RC Parkjet. So donate please! Sometimes just a few dollars means a big difference.
That is the short version of navigating around the site. So now let's get to some of the questions we get from parkjets newbies or just people wanting to build for the first time...
So which plans do you recommend for beginners?
If you have never flown and RC airplane before, we highly recommend checking out RC Powers for the awesome E-book and video series they have put together. Full disclosure: we are an affiliate and will get a little commission if you buy through us, but the important thing is to get it. It will save you money. It really is the best resource available for beginners. Having said that, Parkjets has many options for great plans for beginners, and depending on how much time you want to spend building, the answer varies. For some people, they like to build for months, doing a little at a time. For others, they want to start the build on a Friday and be out flying on Saturday. However you want to approach your first scratchbuild, we have some guidelines you should consider: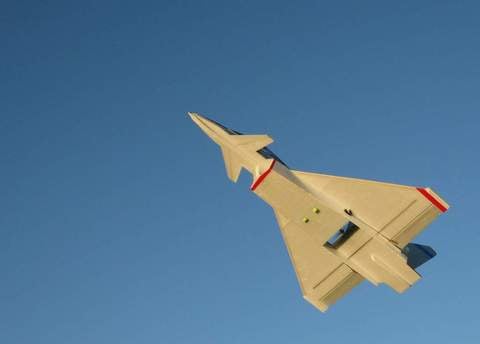 Tomas Hellberg Designed Eurofighter
- First, make sure the documentation is up to your abilities. What we mean is that some plans on Parkjets are pretty basic RC plans. An experienced builder can fill in the gaps, figure it out and come out with an excellent model. But there are plans that include build instructions, comprehensive pictures, even build videos that will help the beginner be succesful. Excellent examples include any of the Tomas Hellberg models, and Steve Shumate designed planes.
- Make sure you understand what it will take to build the model. This typically not only includes the necessary foam and the equipment to put into your model, but also the right kind of paper or printer. A lot of the plans on parkjets are available in what is called "tiled" plans, meaning you can print them out on a home printer and put them all together. However, some plans are available in the A4 format (Europe and elsewhere) and some are available in "8.5" x 11" sheet format common in the U.S.. A lot of plans offer both, but just check out that detail as well, right by the link to download, it typically says what format the plans are availabe inside the .zip file.
- For beginners, we also recommend going with a profile or shock style model. You can see examples here and here. They are easy to build and are very stable in flight because of their design. And WHEN you crash it, it won't really be too depressing because you only spent a few hours putting it together.
Which models do you generally tell beginners to stay away from?
This is a sensitive area because we don't want to sugguest that any of the models are too difficult, but there are some really challenging models on parkjets. One of the more complicated builds is the Steve Shumate F-14. The swing wing is awesome but it can mean an extended build time. Same for the Steve Shumate F-22 and SU-37. Complicated builds. There are other similar models too, all with long build times and complicated finishing processes. Does that mean those RC plans should be off limits? Absolutely not. Just consider what you want and what you are willing to sacrafice when the model gets a little damaged.
How much does it cost to get started in RC Airplanes?
One post that is a good read is our "Buy or Build" post. It helps outline some of the differences between an out of the box solution found in a local hobby shop or online and building from scratch. But let's assume you are building from scratch. The cost of the plans are free. But you have to buy some foam, typically a couple of large sheets of Depron can be had for about $20. You need a motor and speed controller: About $40. A transmitter and receiver: About $200 Battery and battery charger: About $150 Servos and misc gear: $50. All told you can see that there is some upfront costs involved. But after that, you can take that gear and put it in just about any suitable airframe and have some fun at your local park. If you do it right, purchase the correct equipment up front, yo will save yourself a lot of lost money and frustration.
Getting started in RC, especially RC airplanes can be overwhelming. But if you take a little time, you can learn a lot real fast. And if you want the extreme short cut, again, check out RC Powers Online Course.
The important thing is to keep building, crashing, and learning!
NOW SIGN UP FOR OUR FREE MONTHLY NEWSLETTER!
PROP TO EDF CONVERSIONS
Probably the number one question we get in our inbox is whether we have documentation to convert some of our excellent RC "pusher" prop plans into EDF, or electric ducted fans power. Since we get the question all the time, we thought we would spend a little time discussing our feelings on the whole subject. If you are roaming around your local hobby shop, you will notice a lot of the boxed RC airplanes come set up for EDF. So it has a lot of RC builders wondering if its a right fit for them. Let's break this down a little.
First, several of our plans are excellent candidates for EDF conversions. The excellent F-14 and F-22 designed by Steve Shumate both will accommidate EDF fans. Both of these parkjets require dual fans, which works out great anyway. And don't forget, parkjets offers several models designed specifically for EDF. So check those out too. But with each of these conversions, the builder will have to make some adjustments to the original design like moving some pivot rods, perhaps enlarging some areas and of course working on ways to mount up the system inside the airframe. The result is pretty neat. They look and sound just like a mini version of the real thing. The F4D Skyray is also an excellent candidate for EDF conversion and in this case is pretty well documented with instuctions and pictures.
For the profile type RC parkjet, we have seen a very simple and very effective EDF conversion. It doesn't really offer the scale look, but offers an alternative to the mid mounted pusher prop that most of the designs have been built around. Below is an excellent video of the Tomas Hellberg F-22 with an EDF fan strapped to it. Most of the Tomas Hellberg plans would work well for this type of simple conversion.
You can see the builder just made a little modification and everything worked well. There are other videos of him flying the jet and it works quite well. The F-22 is a very versitile airframe.
So what do we think about conversions? Well, its complicated. We know there are some modelers out there who would rather not have an airplane than stick a prop on the back of a jet. It just seems so...wrong. We get that all the time. The EDF offers a lot of speed, no real torque and good speed. Some modelers are just looking for something different too. And we can certainly appreciate the attitude. Sometimes a builder wants to venture into a little different RC hobby.
However, for us, we like to stick to the prop. The 6 x 4 prop on one of these parkjets performs so well. The effeciency is through the roof, especially compared to EDF. Your battery will last longer, you need a smaller electronic speed control, the battery doesnt get as hot, and flight times are generally longer with the prop. Also, the thrust off the bat is so much better that a prop driven plane is often easier to hand launch. The reason is that the prop just grabs and moves so much more air in a single rotation that it leads to more bang for the Watt. EDF has to work so much harder than the prop to move the same amount of air. Of course, we all know that sometimes giving up a little gas mileage is worth the cool factor right? I mean, not everyone wants EFFECIENT when you can have a SLEEK right? So what about those RC pilots out there that want and must have and EDF driven airplane?
Well, luckily, EDF is getting better. And frankly, its darn near taking over the industry. At least from those models that come out of the box. Our recommendations is to stick to the bigger fans (68mm and up) and make sure you have a good wide airframe like the F-22, F-18 or even a delta type wingspan like the F4D.
And remember, when you toss that EDF for the first time, give it a heave, because that fan won't start to really push the air until it winds up and gets the plane moving through the air. Your thrust is limited at first.
You have heard our thoughts, now tell us what you think. EDF or Prop? There is no wrong answer as long as you are out there building RC airplanes from scratch or plans. You can't go wrong.
src="http://pagead2.googlesyndication.com/pagead/show_ads.js">
BUY OR BUILD
Sometimes we here at Parkjets get the very good question related to whether or not its best to buy a ready to fly airplane or whether it best to strike out on your own and build it. Most of the time, people want to know which is cheaper and what is the real difference (besides the obvious).
Sometimes we here at Parkjets get the very good question related to whether or not its best to buy a ready to fly airplane or whether it best to strike out on your own and build it. Most of the time, people want to know which is cheaper and what is the real difference (besides the obvious).
With ready to fly, or RTF, the RC airplane pretty much comes ready to go. Sure, there are always a few things that have to be done to the plane but typically its very quick and can be done in a matter of a few minutes. The same goes with almost ready to fly (ARF) RC airplanes. With ARFs, the owner will have to do some glue up or some minor construction, but typically, anyone can do it, it takes very little skill other than reading through the instructions. So what are the benefits of a pre-made RC airplane?
1. It will look fantastic and scale. Modern manufacturers go to great lengths to make their kits look great on the ground and in the air.
2. The system will work. In other words, the electronics and other necessary gear you need comes with the RC airplane, so you know it will work.
3. You will have a great set of instructions and the whole process is pretty much fool proof. With an RTF, you will be up and running in no time. With building, it can take a couple of days to weeks to complete a project.
Okay, so what are the disadvantages of an RTF or ARF RC Airplane kit?
1. You will crash it. And the electronics that came with it will probably not work in other applications. With RTF or ARF, the servos, motor, electronic speed controller, etc work well for that specific airplane, but won't work so well in other airplanes.
2. You have a limited canvas to customize your plane.
3. You have very little uniqueness at the flying field. In fact, chances are, lots of other RC pilots will have had or do have the exact same RC airplane as you.
Why do we prefer to build our airplanes most of the time? That is pretty simple actually. We like to build for two main reasons.
1. The money. Up front, building you own will cost a little more. After all, you are purchasing your own gear like motors, radio, receivers, electronic speed controls servos. You will need some basic soldering equipment too. Maybe a bench in the garage, if you get fancy, some diagostic equipment. You have to hunt down things like propellers and EDF fans, clips, control horns, push rods and a whole assortment of goodies to help you go from nothing to a fully flying machine. But once you are up and running...it's cheap.
The airframes, like the ones here on Parkjets can be constructed with a few dollars in foam, usually around $10-15 dollars worth. And all that gear you bought? It will work just fine.
2. Creative Control. Hey, its part of the fun and challenge. Building something from nothing. And with all the free RC plans out there, its easy to get the design that fits your style. The paint job is up to you. The decals, you can design your own. Some guys out there go crazy and make their own creations that blow the doors off of anything you can buy. For us, building offers something for everyone. You have control. You are not limited by what is on the shelf, only what is in your mind.
So there you have it, the pros and cons of building vs. RTF and a few things in between. And we don't mean to suggust this is an either or situation of course. Lots of people have fun doing both. And then there is the kit market, like the kits made by 6mmFlyRC.com that offer the builder a jump start on a project.
The important thing is to keep flying, keep crashing, and keep learning!
NEW CAD SOFTWARE
We recently had a site visitor suggust we post a link to a new FREE CAD software location out there on the internet.
Martin wrote:
"Thought I would share a new and very cool Free CAD package made by a very respectable CAD software supplier. Its called DraftSight, made by - yup, Dassault Systemes!
We recently had a site visitor suggust we post a link to a new FREE CAD software location out there on the internet.
Martin wrote:
"Thought I would share a new and very cool Free CAD package made by a very respectable CAD software supplier. Its called DraftSight, made by - yup, Dassault Systemes!
How cool is that - a 100% AutoCAD compatible piece of free CAD (that even writes and reads DWG's) made by the company whose main order of business is actual jet fighters !
Please do post a link on the site, I am sure the other guys will love it.It is an awesome piece of code, but it requires modern resources - nothing less than a Core 2 Duo with 2GB of RAM will do, running Win XP. Works really well in 7."
GOOGLE SKETCH UP & PARKJETS
We recently got an E-mail from a Parkjets.com visitor that was interested in putting some more plans on Parkjets. We love this kind of E-mail. However, the individual had no idea how to put his plans into electronic form.
There are many different programs out there to help people with Computer Aided Drawing (CAD) but one program has pretty much cornered the market for part time designers. Google SKetch Up.
We recently got an E-mail from a Parkjets.com visitor that was interested in putting some more plans on Parkjets. We love this kind of E-mail. However, the individual had no idea how to put his plans into electronic form.
There are many different programs out there to help people with Computer Aided Drawing (CAD) but one program has pretty much cornered the market for part time designers. Google SKetch Up. It is a free program that allows you to draw your plans and print them out in PDF form.
That is the perfect format for distribution.
One of the hardest things about CAD drawing is that there is a learning curve you have to overcome in order to use the software. Thankfully, we found these excellent videos that outline exactly how to use Google Sketch Up for the purposes of drawing parkjets! YouTube pretty much has everything.
So sit back, get comfortable, and get a brief 101 on how to use Google Sketch Up to draw out your plans. Don't forget to share them with the world through Parkjets.com!
SOLDERING IN RC
One of the essential skills to have when starting out in R/C is the ability to solder a few connections together. It may come to the surprise of the new moderler that often times, connectors on the ends of batteries and motors require you to break out a little soldering iron and a few minutes of time.
First up is a great 15 minute how to on replacing bullet connectors on your electric motor.
Next up is how to solder Deans connectors, an essential skill for anyone.
And to wrap up the great tutorial is a walk through on how to solder bullet connectors onto a speed controller. Excellent!
INSTALL SERVOS, CONTROL HORNS
Many times, we get E-mails on how to install servos, push rods, control horns and all the various components needed to get a simple foam parkjet off the ground and actually be able to control it.
As it turns out, we found an excellent video made by the guys at RCSUPERPOWERS that clearly explains the whole process, so why reinvent the lesson?
One key message here, there is really no wrong way to do it, a lot of times, builders have their preferred methods of putting in the servo and control horns, but ultimately, there are just a couple of rules to follow and then installing the servos and control horns is a snap.
For the advanced builder, many times hiding the servos and push rods is half the fun, figuring out how to route them through the plane and only expose small parts help give the plane a great scale look and keeps all the ugly bits out of sight.
So here is the video, take a few notes and download some free plans and get to building.
HOW TO BEVEL CONTROL SURFACES
In an effort to expand the knowledge here on Parkjets, we thought this video is a great instruction on how to bevel the edges of the control surfaces and hinge them on your foam parkjet.
The video is produced by the guys over at RCSuperPowers (who have great plans on their site) and is a great example on how easy it is to work with foam.
One note here is that Dave (in the video) uses a razor to simply cut away the excess foam, but it is very easy to use a bit of sandpaper and a block to simply create the necessary angle on the edge of the control surfaces. Either way, a very simple way to make sure your control surfaces have the necessary throw to make your parkjet do what you need it to do.
FLAT PLATE WINGS
For the people that are new to RC and parkjets in general, the question always comes up - Does a flat plate wing work okay or should I spend the time and money to have a real airfoiled wing made? Great question.
One the things that makes parkjets so popular is the ease of construction. Throwing on a flat piece of foam and rounding over the leading edges is certainly a lot easier than getting an airfoiled wing made.
To be sure, they do have a little more drag and a little less lift than an airfoiled wing, but on parkflyer jets, the difference is barely noticeable, especially when you consider the time and cost of putting a full airfoil wing on your parkjet. Parkjets usually have swept low aspect ratio wings, high thrust-to-weight ratios, and have many elements that make the plane have high drag, like the intakes and flow-through inlets, so flat plates work very well and greatly simplify construction.
The answer to the question, without getting too technical...On these kinds of models, go flat plate and don't worry about spending the time and energy on an airfoil.
NOTE ABOUT FREE PLANS
These plans are NOT owned by Parkjets.com, they are posted on the Internet and they are owned by the persons who created them.
We assume no responsibility for what you do with the plans, most creators want you to build them for your OWN PERSONAL USE. DO NOT RESELL THE PLANS.
These plans are NOT owned by Parkjets.com, they are posted on the Internet and they are owned by the persons who created them.
We assume no responsibility for what you do with the plans, most creators want you to build them for your OWN PERSONAL USE. DO NOT RESELL THE PLANS.
These plans are subject to removal or deletion at the whim of the owners. So, if you find a bad link, please send us an e-mail and we will try to take care of the problem. Most of these Parkjet plans can be found on the RC Groups E-Zone discussion boards.
We HIGHLY Suggest you join the RC Group's and participate in the build thread discussions.
The owners of the plans appreciate knowing there plans are being built, and they will gladly answer any questions you have about the construction, and flying of there creations.
Most of these plans are stored in Adobe PDF's. Most computer's come with an Adobe reader, but if you do not have one, just go to http://www.adobe.com and download the latest free copy of the Adobe Reader.
You will notice that some ZIP files contain "tiled" and "non-tiled" versions. "Non-Tiled" are often referred to as "full size."
"Non-tiled" plans are a single diagram that you need to take to a printer such as a Fed-EX/Kinko's and have them print the plans on a size "E" Draftsman sheet.
All of the Non-tiled plans should be printed on a 36" X 48" Sheet (Unless otherwise noted on the plans)
"Tiled" plans are the same as the "non-tiled" only they are "broken-up" into sections that you can print on your home PC, and then tape together into a large sheet.
FREE CAD PROGRAM
So what if you want to ditch the pencil and paper and move to a more precise form of drawing up your plans but don't want to spend a bunch of money just to draw them up? Simple, download this free CAD program and get to drawing. Sure, its a little limited, but should work well for most people.
So what if you want to ditch the pencil and paper and move to a more precise form of drawing up your plans but don't want to spend a bunch of money just to draw them up? Simple, download this free CAD program and get to drawing. Sure, its a little limited, but should work well for most people.
Google SketchUp
Lots of designers using Google's SketchUp program to design parkjets now too. They have a limited free version and a paid version as well.
PLAN PRINTING SERVICES
So you are ready to print your plans but don't have a Kinkos or other printing service around to get the job done. Now what? Well, there are a couple of options for you here.
Winger Models is a great choice For Original and Reduced Size Plans. Almost all plans offered on Parkjets are included. You can pay via PayPal. Buy On-line and have the plans mailed to you. It's that easy!
If you are planning on super sizing your parkjet, you can see if LBMiller5 of RC GROUPS can help. He can print all of Steve Shumate's Parkjet Plans like the F-14, F-15, F-18, T-38, Saab Gripen, and Super Bandit are now available in Larger Sizes 133%, 150%, 166%, 175%, and 200%. A portion of the sale of each set of plans will be paid to Steve Shumate as a royalty fee.
Contact LBMiller5 through RC GROUPS. (Note, you will have to be a member of RC GROUPS to send LBMiller5 a message through RC GROUPS. It's free to join.)
BUNGEE LAUNCHER PLANS
Sometimes it's easier to get your parkjet in the air if you can use a bungee launcher. Sometimes the plane is too big, sometimes its just hard to hold. There are plenty of stories out there about pilots getting their hand or arm cut in by the propeller and that usually requires a trip to the emergency room.
Here is a great design for a home built bungee launcher that incorporates a foot pedel so the entire thing can be operated by one person.
LINK TO RC GROUPS BUNGEE BUILD THREAD
FAN CALC 1.1
This is a great resource to help you figure out everything you nee to know about Radio Controlled EDF fan calculations.
NOTE: This program only works for PC's.
This is a great resource to help you figure out everything you nee to know about Radio Controlled EDF fan calculations.
NOTE: This program only works for PC's.
TOOLS YOU NEED
Tools you might need:
Some basic tools you will need are:
- Hand Drill or Dremel tool, tiny drill bits, and grinding stones
- Small size Tap and Die Set
- Scissors, many shapes and sizes, and some specialty scissors like "Canopy Scissors"
- Tiny Screw Driver and Nut Driver set
- Knifes
- Utility knifes
- "Exacto" Knifes of all sizes and shapes
- Single Edge Razor blades
- Pizza cutter (Yes you read that right, a big round one on a handle)
- Straight Edge Rulers, measuring devices,
- Postal weight scale
- Saws and cutters, Including mini-hacksaw, mini-scroll saw, Jeweler's saw
- Electrical Tools, needle nose pliers, wire cutters, strippers, Soldering Iron and stand
- Twenty pound sledge hammer (not really, Just seeing if your paying attention :-)
- Small files of all sizes and shapes (Jewelers files)
- Sandpaper from 80 grit to 400 grit
- Rubber gloves, masks, paint and epoxy mixing sticks, Clamps, and T-Pins (various lengths)
Some optional equipment you may want:
Model Spray paint airbrush, Small spray booth with exhaust fan, Hot-wire Foam cutting equipment (for shaping wings and other large foam pieces.)
BUILDING YOUR 1ST PARKJET
Building Your First ParkJet
If your handy with glues and tools, knifes, soldering iron's, and so forth, you may want to build your first ParkJet, especially if your planning on staying in the hobby long term.
The main advantage of doing this, is that your cost-per-airframe is going to be a lot lower than if you only fly RTF or ARF (Almost Ready to Fly) ParkJets. Your cost is even lowered further if you crash your jet, you just take the old parts out of the crashed jet, and install them in your NEW scratch built Jet!!
The foams we use are very cheap, compared to the molded foam kit jets available.
Building Materials - Foam
Some of the popular types of foam that we use to build ParkJets are:
Depron Extruded Foam Sheets (Take-out containers, store meat trays)
Dow Corning Fan-Fold Foam (a.k.a. Blucor, used in Home Insulation)
PolyStyrene Foam (Think of cheap picnic coolers)
Expanded PolyPropylene (Bend able "Memory" foam)
The Top 2 are the most common used, as they sand well, accept most (Foam Safe) glues, and are relatively easy to work with. There are MANY other variations of foams, in a wide variety of shapes and sizes,
BREAKING IN LIPO'S
Breaking in New Lipo Packs
"Thunder Power (TP) recommends no more than 3-5c average discharge for breaking in new packs" ... "overdischarging on the first flight will ruin the battery permanently".
TP also recommends never storing a fully charged pack for more than a week, which is a sensible rule often repeated by other manufacturers.
Gerd Giese of Elektromodellflug.de recommends, based on his experience of testing hundreds of packs, the follwing slightly more elaborate procedure to remove the discharge inhibitor:
0.5C charge - 1C discharge to 3.5V/c
0.5C charge - 2C discharge to 3.5V/c
1.0C charge - 3C discharge to 3.3V/c
1.0C charge - full power use
He claims the above general rules have given him the best results. But my observations would be that it almost certainly depends on the cell type/manufacturer.